TARDIS base structure

Something I had not thought considered in my construction up until now was the construction of the base. It occurred to me as I watched an old episode or other that there does seem to be quite a lip on the floor. I think I initially thought a flat surface so that K9 (I don’t have one (yet!)) might roll in or out without much hassle.

So some plans and sketchwork later, I decided on a structural floor with a kickboard and plinth that matched the tv prop. I also took the opportunity to add some wheels, each with a rated load of 100kg so that should be sufficient to support and shift the structure with relative ease.

TARDIS on its side

With the help of teacher Leon & some especially muscly apprentices, we tilted the TARDIS onto its side to that I could attend to its base. I’m constructing an extra platform for the floor to rest on (currently a single thick piece of ply) which doesn’t have much structural strength.

I’ll also add some wheels to make it easy to move around (should I desire). I figure different driveway locations should keep the neighbours guessing.

TARDIS final corner post details added

I had to glue & clamp in pairs & unfortunately there were only enough clamps to do one pair at a time, so four weeks late, I have completed gluing the corner details. Chris the builder teacher wandered in with his pedal powered broken collar bone (ouch!) and commented that the corner details added an improved dimension to the build.

Watching an old episode of Jon Pertwee’s I noticed an added middle divider on all sides of the box using the same motif as the door stopper, so off to hardware again to get some more timer!

After this week’s gluing is dried, I’ll get some help to tip the whole structure on its side so that I can build the floor structure.

Argh HTPC

Atomic MPC has been suggesting for a while that the best heatsink/fan for a HTPC build was the Scythe Big Shuriken. I’d seen one in April back in Osaka, but was not quite in the right brainspace to purchase it. So, I placed an order with PCCasegear http://pccasegear.com/ (whose excellent next day delivery to rural Vic arrived promptly at our PO box) as the smaller profile should fit.

Yes, it should.

Sadly, it doesn’t and the final configuration doesn’t allow for my 12GB of RAM. All the mucking around also meant that I had to clean off the thermal goop from the CPU.

Defeated, I’ve installed the stock Intel heatsink/fan.

TARDIS corners

A flaw in my design was leaving out a detail on the timber corner posts which had been bugging me. In order to achieve the ‘correct’ exterior dimensions and not build something that would collapse the ground under it, I decided on the whole to use relatively thin timber (12-18mm hardwood)  for the various aspects of construction.

Various details such as above the windows, around the light boxes, and the corner posts have a very much stepped design giving the prop a 3 dimensional depth. By the time I’d completed the corner posts, I’d noticed that I’d omitted an extra ‘step’ and thought that I’d add these back in by creating some shaped timber slats to straddle the height of the corner posts.

This is also a slight design variation as the timber detail highlights the light box (as used by the Ecclestone & Tennant doctors) but is not seen on other props where the lightbox simply sits on top of the corner posts.

even more HTPC

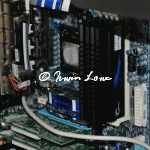
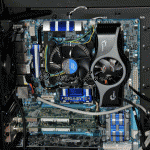
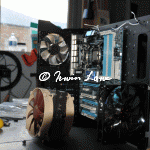
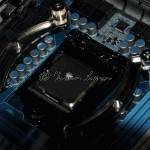
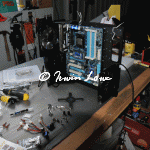
What’s a HTPC build without a hurdle or twenty? One of my concerns with a HTPC is reducing the heat as much as possibly whilst maintaining a low noise level. For the CPU, this means a whopping big heat-pipe finned heat-sink arrangement with PWM (or resistor throttled) fan.

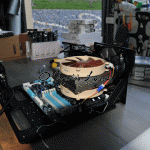
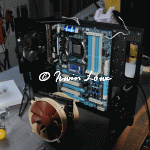
Having done the research, I decided on the Noctua NH-C14. Large fins, low profile, throttled fans & 2 at low speed for extra heat removal. It also fitted in the dimensions read off the specs. The Level 10 as part of its beautiful design allows easy access to the back of the motherboard for mucking around such as this.

Unfortunately, even though the fan fitted, it caused 2 issues: firstly the size of the 12cm heatsink made contact with the RAM heatsinks (I had decided to go for 12GB of RAM in 3x 2x 2GB). Ok, simply workaround: live with 8GB for now and contemplate later. Second issue was that the case lid for the motherboard section was hinged and therefore did not close for the size of the heatsink/fan.

ARGH! Even though I’d like to finish the project, as the sun has now set I’ll put this in the further contemplation required basket.

more new HTPC build

I decided on the Gigabyte P55A UD6 because I wanted the maximum internal componentry for SATA connection. This board has 8 of them, 2 of which are SATA3. One for the boot drive (Vertex Turbo SSD, which I flashed up 2 firmware levels – much easier to do before installing OS!), one optical BD drive, one 2TB main drive for recorded TV, and 5 drives for saved videos.

I’d had some prior experience with RAID and have been fairly unhappy – the implementation of RAID-0 just did not justify the risk of complete data loss for marginal speed increase. RAID-1 gave internal mirroring, but at the cost of space and speed. RAID-5 might have been a go-er except that I have been reading that in the event of a single drive failure, the likelihood of the other drives rapidly following suit is quite high. RAID 10 didn’t suit, again complexity but definite lact of space.

I wanted bang for buck, so formatted 5x 2TB drives under GUID and connected them as JBODs. I’ve then used my Drobo-s for a Sync-toy backup.