Category Archives: Woodwork

TARDIS lock

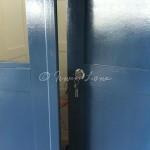
The door lock took me longer than expected due to my having used a thinner timber stock than would be usual for a door. This was a deliberate decision at the time as I didn’t want the doors to be too heavy, and since I was starting with the doors, I felt that the entire construct would be too heavy set had I gone this way.

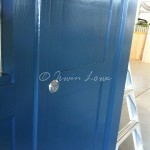
So now it bites me. I’d prepared a 3mm shim last week on discovering this but after about 30 minutes of mucking around, discovered that I really needed at least 8-10mm. Luckily there’s heaps of spare timber and offcuts lying around, so a few chops later, a nice mount for the lock is complete.

Got a call from Anna half way during the day saying that the signwriter’s ready with the signs. Very exciting.

TARDIS door furniture

I thought that I might get the door furniture installed and the LED light strips also. I’d ordered 25 white LED strips from Jaycar a couple of months previous and had received them by courier (living out in the sticks, a surprising number of companies refuse to deliver to Post Office Boxes).

So opening the package, I discovered that I was short sent. B*m. A quick call to the good people at Jaycar and the balance is due to be sent out to me. meanwhile, I used the spare time to have a further contemplate about how exactly I was going to attach the strips to the insides of the windows. I decided to use the unexpected extra time to make a number of slats to brad to the inside of the frames thus allowing the strips to be mounted 90 degrees to the glass panes.

I used the balance of the afternoon to start on the door lock. Surprisingly, I discovered very affordable Yale locks ($20!) at Bunnings. Running out of time, I discovered that I needed a shim because the door timber I used was about half the width of a typical door. Next week’s problem.

TARDIS windows installed

It’s taken a heap of fiddly work: creating a jig to make identical slats, sourcing & cutting identical slats, sanding to finish, routing half-laps for fitting, discovering I’d used the reverse face instead of the ‘beauty’ face, nailing, gluing, sanding (again), painting (repeat x3+), and fitting the glass panes.

But it’s done!

A few of the frames were a tad snug requiring the Graham Garden “Just one small delicate finishing touch” of a belting into place with a spare two-by-four. And I’ve discovered a few gaps in the frame which is not surprising as I’d rough routered the sandwiched layers two years ago now and (at the time) crossed my fingers. So a small amount of remedial puttying and possibly a bit of extra timber filling to block out stray light from the inside.

I’ve sourced some LED strips from Jaycar for the windows (ala Ecclestone’s TARDIS) and  signboxes and found some white LED Christmas bud lights which I’ll use for the roof light.

Final interior coat

A second interior top coat which I’d decided to apply by roller. I’d made maybe 5 minutes progress starting with the ceiling then planned to work around and then down. At this stage I had the paint roller tray in my left hand, standing on a saw horse with the roller in my right hand looking upwards. The natural poisition of the left hand tends to follow the angle of the rest of the body, so I soon discovered that I’d covered myself with white acrylic!

After an hour’s worth of this, I decided that a brush might be the better option, so ended up again at Bunnies with credit card in hand. I purchased a premium ‘rat tail’ 75mm wide synthetic brush which gave a very satisfactory finish. I’ve now finished the interior as much as I’d wanted to, and yet the artiste inside my head keeps whispering “one more coat”. At this stage, I’ll ignore the inner voice as I’ll miss the whole of next week for meetings.

Before finishing up, I couldn’t help myself but to dry fit one of the window frames.


Glass panes attached

Amazing what you can accomplish when you’re under the gun. I was hopind to set aside a few hours to silicone in the glass panes, lovingly placing each piece with care & precision…

As it happened, I just ran out of time (insert ironic music here), and so ended up with about 35  minutes to glue in 6 panes for 8 windows. Let’s see, that’s (using fingers and toes), less than one minute each. If it were prescriptions, I could fire them out that double that rate, but this? I guess my time starts now…

I’m still sanding

So, a final sand, air blast, and coat of blue for the exterior, and I’m pretty much done. I put a layer of undercoat on the inside on Cup Day which was miserable wet and cold. I was hoping to have a coat on in the morning and then reapply later in the afternoon (judging by previous external efforts, this was feasable). However, I was defeated by the weather. After I’d gotten back from lunch (and putting on an each way bet for Illo), I’d discovered that the morning’s paint was still quite wet. Nothing to do then but go home as I’d run out of extra other things to do. I’ll contact a signwrite soon and organise those requirements which hopefully shouldn’t take long.

Meanwhile, I’ve taken some sanding, and some arty shots.


Waiting for paint to dry

Something that I have discovered to be particularly useful in my short lived cabinet making career, is that it is often worth having several things on the go simulataneously. Not so much from the point of view of being a go-go-go freak, but more that there are often down times when you literally need to wait: for paint to dry, for glue to set, for solvents & timbers to cure.

That’s not to say that down time for contemplation purposes is not valuable (which it is), and sometimes down time can be quite convenient so that you can harass your sister-in-law check out what others are up to, take inspiration or give opinion if sought, or just lend a hand where two are not enough.

Anyway, I’m waiting for the first coat of inside to dry so I’ve test dry fitted the glass panes and made a few minor adjustments where the thickness of paint has sent me acropper.


Third coat of blue & interior prep

Somewhere in the back of my head, I had considered the options for the TARDIS interior. On the Ecclestone episode “Father’s Day”, the set designers inverted the TARDIS exterior panels to face inwards for the empty insides scene. Two other options are straight black and straight white. As I don’t intend spending much time on the inside, not longer being of an age with an overactive imagination, I decided on straight white.

Which left me with the problem of actually doing it, which had not entered my calculations when I started the exterior painting. So, more preparation, more sanding, more scraping, removal of blue overspray from the outside (and ergo, the persistant new though that whire overspray from the inside is going to be inevitable), and generally more sanding.

There’s lots of fiddly bits on the inside because it’s not the beauty aspect, so a few corners and construction details I’d left raw (such as screw holes, dings and scrapes, and various timber fitting repairs where the odd shim was required).

My issue now is that time (sigh) is quite pressing on me for the project to be completed by semester’s end, so I’m going to be a bit expedient with the inside.

First coat of blue

Well, the excitement builds as some blue goes on. Carefully selected by Anna, there are so many shades of blue the TARDIS has been over its time on tele. from a dirty sort in the old black & white ones to a dull dark one in the 70s to the moody mid 200os one to the in-your-face bright blue one at present.

We’ve gone for a colorbond blue which is sort of a grey-blue but it depends on the light that your looking at it with, of course.